Mole
Creek Caving Club
~ Notes on 'Alpine-style' SRT* ~by Sherry Mayo, NUCC
* this page is duplicated from a now defunct website, is not written nor necessarily
endorsed by MCCC or its members.
There has been some editing and additions by Mick for this site.
On this page
|
Comment
These notes are the result of three bods in Canberra teaching
other members of NUCC alpine style SRT techniques. More specifically the
SRT manoeuvres as described here are the result of me, Mark and John
arguing about the best way to do things while our hapless victims
were strung up in trees struggling with our SRT obstacle courses - so credit
should be given here to all those people (Mark, John and our NUCC guinea pigs).
Thanks to Nigel Whittington (N.P.Whittington@spps.hull.ac.uk) for
helpful input and comments. These notes assume a certain amount of fore-knowledge, that you know how to
abseil and how to prussik using a frog rig. Please don't try and learn SRT
from scratch using these notes, you will just hurt yourself. Get someone who
knows to show you how to do it; join a good caving club.
Sherry Mayo, ANU, scmayo@rschp2.anu.edu.au
|
These are some very short notes to summarise the basic manoeuvres of
alpine-style SRT (Single Rope Technique). They are no substitute for practicing the techniques and are
intended just as a reminder. The best way to learn SRT is to get
lots of practice and get a feel for it rather than trying to learn the moves "by
numbers". If you encounter any difficulties underground, familiarity with the
basics will get you over them.Why Bother?
Unlike "Indestructible Rope Technique" (IRT), alpine-style SRT makes use of rebelays and
deviations so that the rope hangs freely down the pitch avoiding rub points and
other hazards such as waterfalls. This has the advantage that much thinner rope
can be used which is much lighter and more compact to carry (or alternatively
you can carry much more rope - useful if you are exploring a deep cave).
Another plus is that abseiling or prussiking on a free hang is easier than
abseiling or prussiking against an uneven wall. The (slight) downside is that
you have to learn how to negotiate rebelays & deviations - the techniques and
equipment used for these manoeuvres are summarised in these notes.
Further reading
If you want more detailed information, read a good SRT
book such as "Vertical" by Al Warild, "Single Rope Technique" by Neil
Montgomery, or the recent e-book,
"Life
on a Line" (free download) by Dave Merchant.
Apart from lots of practice, the thing that will make the most difference to the
ease which which you can do SRT manoeuvres is having the right equipment and
having it correctly set up and adjusted. Properly set up gear will not only
vastly improve the efficiency of prussiking and changeovers, but will also
minimise the risk of cock-ups (i.e. getting your gear in a tangle and getting
stuck on the rope). The diagrams show the set up of gear for a frog-rig, the
most commonly used SRT set-up in alpine caving. IRTers sometimes prefer
ropewalking or other types of SRT rig which can sometimes have slight speed
advantages on long pitches, but which make it difficult to negotiate rebelays
etc.
SRT ascending/descending kit (descender omitted for clarity)
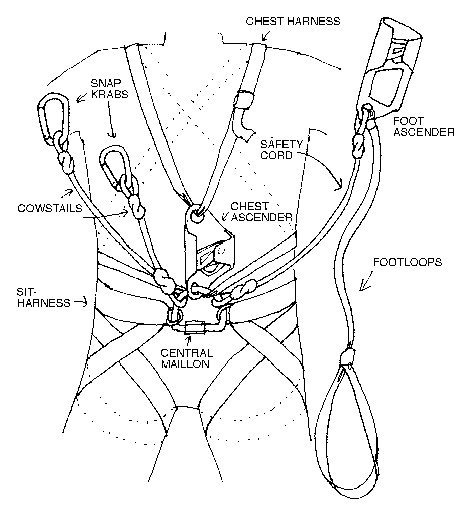 The Harness: The Harness:
this should be a purpose designed caving sit harness. A
sit harness is fairly snug fitting and designed so that the central attachment
point (i.e. the central maillon to which the chest ascender etc is attached) is
fairly low on the body. This is important because the length of a prussik step
is determined by the distance between the chest and foot ascender when the foot
ascender is raised on the rope. If the chest ascender sits too high on the body
this distance is reduced and the caver can only take short prussik steps which is
inefficient. Several designs of harness suitable for caving are shown in the
diagrams. A climbing harness is also shown for comparison. These can be used
for SRT, but are far from ideal because the central loop is too high on the
body. Also there is no central maillon and an intermediate krab or maillon has
to be used to attach the chest ascender to the harness resulting in it sitting
even higher on the body.
The chest ascender: As outlined above, for efficient prussiking the
chest ascender must sit fairly low on the body (about on the stomach, just below
the sternum). For this reason its is best to use an ascender without a handle,
and better still, a purpose-built chest ascender such as the petzl croll which
is designed to lie flat on the chest when clipped through the central maillon.
The chest harness: The purpose of the chest harness is to keep the
chest ascender in position on the body so it moves cleanly up the rope when the
caver stands in the footloops. It also holds the caver in more upright position
on the rope which makes prussiking easier. If the harness is too loose, or the
chest ascender too high, the caver will tend to lie back of the rope when
sitting on the chest ascender, which is both uncomfortable and inefficient for
prussiking. The chest harness should be done up sufficiently tightly that it is
uncomfortable to stand in when you're not on the rope. Most people use a length
of tape with a buckle as a chest harness (see picture). Purpose built chest
harnesses are available but don't seem to work any better than the plain tape
variety, and don't fit at all if you're female (i.e. if you have a bust). The
chest harness isn't intended to be load-bearing and some people use a piece of
bungee cord instead of a tape. This doesn't give the caver as much support on
the rope but can be better for pulling the croll smoothly up the rope. Some
cavers choose to use both a tape and a bungee cord (or similar) and have the
best of both worlds.
Foot ascender, footloops and safety cord: The foot ascender can be a
handled or standard (non-handled) ascender according to personal preference. It
is attached to the caver via a safety cord of dynamic rope (8-9mm is suitable).
The cord can either be clipped in directly to the central maillon by the knot in
the end, or via an intermediate krab or maillon. There is no hard and fast rule
about which is best, it comes down to personal preference. Clipping it in via a
krab or maillon means that it can be unclipped from the central maillon while on
the rope, however extra ironmongery on the central maillon can also cause
problems if yo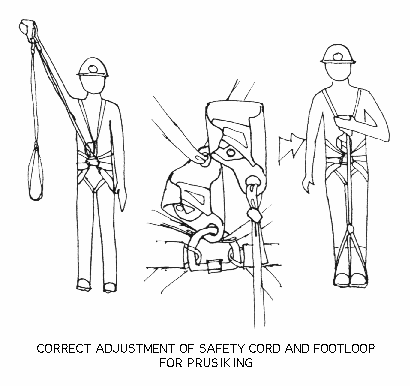 u get into a tangle. However, there are definite advantages to
attaching the other end of the cord (and also the footloops) to the ascender via
a maillon or krab, particularly if you're doing a rope rescue (see rope-rescue
section on the pulley-style footloops rig). u get into a tangle. However, there are definite advantages to
attaching the other end of the cord (and also the footloops) to the ascender via
a maillon or krab, particularly if you're doing a rope rescue (see rope-rescue
section on the pulley-style footloops rig). The foot loops can be made of either
tape or rope. Tape tends to be more hardwearing and if a rope is used, the bit
that you stand on is best protected by a length of tubing. There is a risk with
tape footloops that the tape can get jammed behind the chest ascender cam (this
was the cause of an accident in the UK a few years ago), however, many cavers do
use tape footloops and this type of incident seems to be rare. Footloops can either
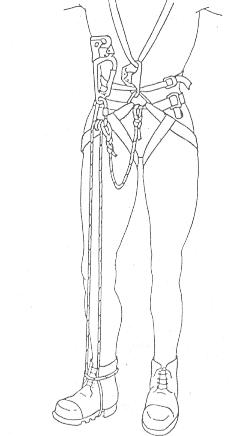
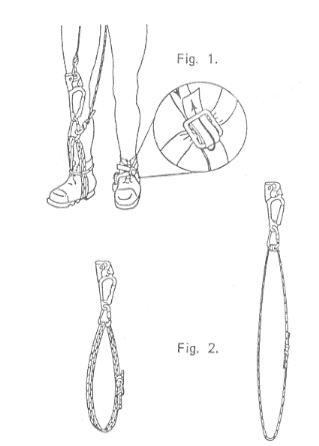
be two separate loops, one for each foot, or a single loop for both feet (as in
picture). It is important to get the lengths of the footloops and the safety
cord just right. When standing in the footloops (off the rope) lift the foot
ascender up till the footloops are taut. If the length is correct the camming
part of the foot ascender should be just above the camming part of the chest
ascender (see picture). Adjust the safety cord so you can reach
the foot ascender when hanging from it on the rope by your safety cord. Cowstails: These are a pair of safety cords used for protection during
manoeuvres. The long cowstail is used for general security when passing
rebelays, deviations and knots. The short
cowstail is used specifically for passing rebelays while descending, during
which your weight is hanging from the short cowstail alone. Cowstails should be
made of 10-11mm dynamic rope with snap krabs clipped through the knot loop at the
end of each cowstail (some cavers use 9mm rope in which case fig 9 knots should
be used for tying the cowstails). A screwgate krab can be used as an
alternative to a snap krab on the long cowstail for extra security while
rigging. The krabs can be secured to the knot loops with
snoopy loops (loops of tyre inner tube rubber) which hold them in place.
The picture shows how the cowstails are tied (there are alternative methods of
tying cowstails but this method is the most common one). To tie the cowstails
take a piece of dynamic rope about 2.5-3m long, and tie a double figure 8 (or
figure 9) knot in one end, tie another double figure 8 (or figure 9) knot as
close to the original knot as you can. Then tie a third double figure 8 (or
figure 9) knot leaving about about 40 cm of rope between it and the
second knot. Swami knots can also be used for the ends of the cowstails - these
help hold the krabs in place. Some cavers use overhand knots for the ends of the
cowstails as they are less bulky than fig 8's etc, but these do reduce the strength of the rope more than
other knots (bear in mind the thickness of the rope you are using).
Make sure all the knots are correctly stacked and then tension the
cowstails by hanging your weight from them. The lengths should now be about
right. Remove any excess tail rope using a hot knife to seal the ends (the
tails needn't be more than 10cm long) and tape the tails of rope to the
cowstails. The short cowstail should be about 25-45cm from knot loop to knot
loop, and the long one about 50-70cm (it should be at least short enough that
you can reach the krab when it's taut). If you clip the cowstails to your
central maillon via a krab or maillon you'll want them a bit shorter than if you
clip the knot loop into the central maillon directly (see comments about
attaching the safety cord above).
Descenders:
There are many kinds of descenders that can be used for
caving but most alpine cavers use bobbins, autolock descenders ("stops"), solid
descenders or racks. The pictures show
the way a rack and bobbin are rigged, for abseiling and for locking off (i.e.
to lock the descender so it can't move on the rope). The stop works in basically
the same way as the bobbin, except it also has a brake lever. Racks:
These provide friction by weaving the rope around a series of aluminium (or
sometimes steel) bars. Commonly the first (uppermost) and third bars on a rack
are fixed, and the second, fourth and fifth bars unclip on one side allowing the
rope to be looped behind them. It is possible to "suicide rig" a rack by
looping the rope around the wrong side of the bars - this will undo itself as
soon as any weight is put on it so always check you've rigged it right!
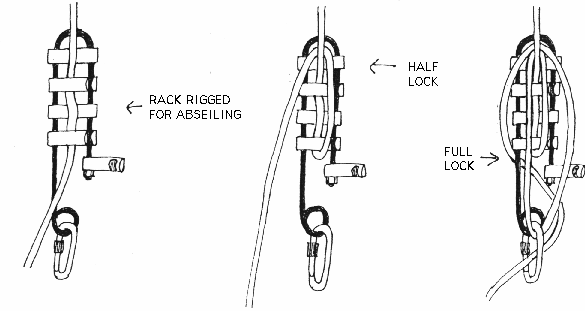
Use of rack - running and locked positions. Bobbins: The rope is wrapped around two fixed wheels to provide friction
and then clipped through a braking krab (see picture). One side of the bobbin
can be unclipped at the bottom allowing it to be swung open for attaching or
detaching the rope. If the rope is very "slow" (i.e. fat and stiff therefore
slowing the descent) a bobbin can be "C" rigged with the rope passing around
both wheels in a "C" rather than "S" configuration. If the rope is very fast,
abseiling with the bobbin on half lock can be used to slow down (see
picture).
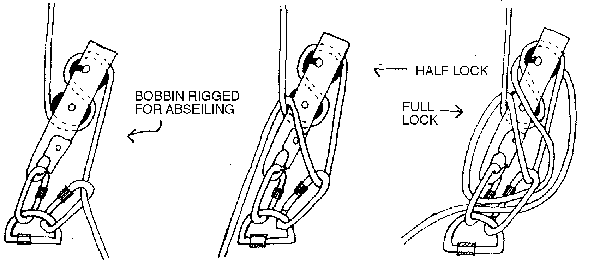
Rigging and locking off a bobbin
Autolock descender ("stop"): These are a more sophisticated
version of a bobbin with a brake lever. When the lever is squeezed you will
"go" and when the lever is released you will stop. If you're going too fast
remember to let go, it sounds obvious but "it isn't always the most natural
reaction" as it says in the Petzl catalogue (people sometimes squeeze the handle
thinking it will brake their descent). Some versions of this type of descender
are designed to stop when the handle is either squeezed or released and only
"go" in the middle position, but these tend to be much bulkier. Whaletails
and Goldtails: These solid block style of descenders (Spelean WhaleTails
and SRTE GoldTails) deserve special attention, because of their popularity with Australian cavers,
and have particular advantages for Tasmanian caving. These are
suitable for most general caving and feature simple fail-safe rope-threading.
The newest ones come with 2 safety gates for maximum security. The method
of locking off is similar to that used for racks, shown above.
Their disadvantage is they are more heavy and bulky (machined out of a solid block
of aluminium) and also they are quite long which can make otherwise
straightforward SRT manoeuvres a little more difficult since they take up more
room on the rope. Their advantages include the in-line design that avoids any
rope twist; superb heat capacity for longer pitches; spreading the friction
over more rope and avoid tight strain points for greater rope longevity;
excellent friction control (by varying the number of slots in use, as well
as
lower hand control) to cater for various descent speeds, rope thickness
and bottom rope weight; can be used for doubled rope descents; and are
also ideal for rescue applications.


SRTE Goldtail
Spelean Whaletail Other
descenders: Lightweight descenders that are often popular with climbers such as Figure
8s, or stitch plates are not suited to caving as you have to unclip them
completely to get them off the rope (making dropping them and falling more likely on a
rebelay crossing). They also have poor friction control, cannot be easily locked off, and tend to
put a twist in the rope
(which is really annoying when you're
spinning round on the prussik back out) and wreak internal damage to the rope.
Such devices are strongly discouraged for any caving, and are absolutely
banned from use on MCCC ropes or club caving trips.
Notes on abseiling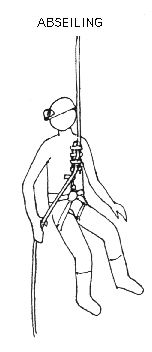
Controlling speed while abseiling:
Once you have attached your descender to the rope you are ready to
abseil. The principle is the same for all descenders - it is the tension of the
rope below the descender that determines your speed. When abseiling hold the
lower rope firmly with one hand down away from the descender. If you hold the
rope taut you shouldn't move at all, and to move just let the rope slip slowly
through your hand. With a bit of practice you should have no trouble
controlling your speed. As well as being able to control speed you also need to
know how to lock off a descender so that you can "park" on the rope without
needing to hold the rope below you. Methods of locking off a bobbin and a rack
are shown in the diagrams Bottom belaying:
This can be used to provide extra security for novice abseilers. The belayer
stands holding the bottom of the rope. If the abseiler gets out of control and
starts going too fast the belayer can slow them down (and stop them if need be)
by pulling on the rope. This tensions the rope passing through the descender
which increases the friction and slows the descent. Prussiking
Prussiking is the method of ascending the rope in SRT. Traditionally this was
done using prussik knots which was slow and awkward, but mechanical ascenders
have made prussiking much easier. The ascenders have a sprung loaded cam which
slides up the rope but not down it. The caver wears a chest ascender attached
to the sit-harness and held in place with a chest harness (see picture). A
second ascender is attached to the caver via a safety cord. A pair of footloops
are attached to this ascender (the foot ascender). The ascenders are put onto
the rope by opening the cam, slipping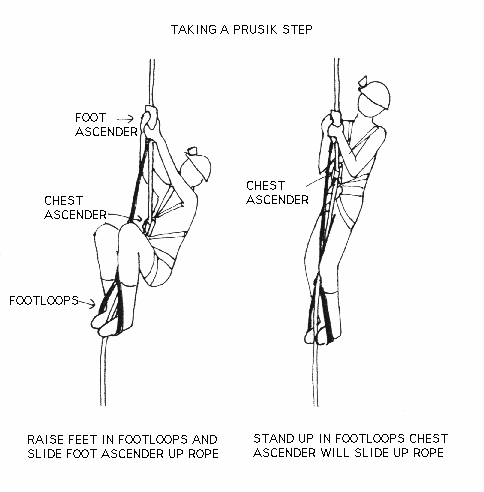 the rope in and letting the cam close on
the rope. The cam is usually prevented from opening fully by a safety catch
which has to be disengaged for getting the ascender on and off the rope - for
any other manoeuvres the safety catch should be left in place. the rope in and letting the cam close on
the rope. The cam is usually prevented from opening fully by a safety catch
which has to be disengaged for getting the ascender on and off the rope - for
any other manoeuvres the safety catch should be left in place.
The chest ascender is put on the rope below the foot ascender. The caver sits
down on the chest ascender which will be supporting their weight on the rope.
The feet are put in the footloops. While sitting on the chest ascender the foot
ascender in raised up the rope (you will need to lift your feet at the same
time to take the weight off the foot ascender). Then the caver stands up as far
as possible in the footloops and the chest ascender slides up the rope. The
caver sits back down onto the chest ascender. This sequence is repeated over
and over to progress up the rope. The footloops need to be adjusted so that
when standing up in them the chest ascender almost meets the foot ascender.
Sometimes the rope won't slide freely through the chest ascender, particularly
when you are at the bottom of the rope. With practice you can grip the rope
between your feet while standing up in the footloops which will pull it through
the chest ascender. When standing up in the footloops, push your feet downwards
under your bum rather than out forwards as it makes prussiking easier and more
efficient. Bottom weighting:
This can be used to assist ascending cavers. The belayer
stands holding the bottom of the rope with a firm, but gentle weight to aid the
rope passing through the chest ascender. Of course, the last party member to
ascend will have to self-feed the rope through.
A rebelay is where the rope is re-attached (belayed) to the rock part way down a pitch
(see picture). If the rope from the top of the pitch meets a rub point/
waterfall/loose rock etc. the rope is rebelayed to the rock
over to one side so that the lower part of the rope (which hangs down
from the rebelay) avoids it.
Abseiling: - Abseil until you are level with the rebelay knot -
DON'T abseil past it!
- Clip short cowstail into rebelay (into the knot or the
maillon)
- Abseil until your weight is taken by short cowstail
- Take
descender off upper rope and put it on lower rope
- Lock descender off (full
lock)
- Unclip short cowstail by standing in rebelay loop or on handy ledge to
take your weight off it.
- Transfer your weight onto the descender
- Unlock
descender and away you go...
NOTE: The long cowstail can also be used for extra safety during this manoeuvre:
Clip it in initially at the same time as
the short cowstail and leave it clipped in for the whole manoeuvre, only unclip
it just before abseiling when the descender is half unlocked.
This will give you protection should you fail to rig your descender
properly.
Prussiking: - Prussik up to
just below rebelay knot.
- Clip long cowstail into rebelay
- Take weight
off chest ascender by standing in footloops
- Transfer chest ascender from
lower to upper rope
- Transfer foot ascender from lower to upper rope (watch
that the safety cord isn't wrapped round the lower rope)
- Unclip long cowstail
from rebelay (you may need to prussik up a little to do this until it is slack)
A deviation (or redirector) is another means of avoiding rub points and
other hazards by altering the hang of the rope down the pitch. The rope runs
freely through a krab which is attached to a belay via a tape or rope-loop.
This deviation pulls the rope away slightly from its natural vertical hang
to move the rope below the deviation away from a rub-point. A deviation
never bears the full weight of a caver (only a fraction of it) and
consequently deviations can sometimes be used where there isn't a sufficiently
strong belay for a rebelay. Since deviations sometimes use poor belays you
should never load them with your full weight. In the description below, the
cowstail is clipped into the deviation merely to stop you swinging away from
it - at no point should you be hanging from the deviation itself, your weight
should always be taken by the rope.
Abseiling: - Abseil down to the deviation (you may want to lock
off your descender)
- Clip into the deviation with long cowstail
- Unclip
deviation karabiner from the rope below you and clip it in on the rope above you
- Unclip cowstail and continue abseiling
Prussiking:
- Prussik up to the deviation
- Clip into the deviation with long cowstail
- Unclip deviation karabiner from rope above you and clip it into the rope
below you
- Unclip cowstail (you will find that you swing away from the
deviation) and continue prussiking
This on its own is not a common manoeuvre underground, but it is the basis
of other manoeuvres such as knot passes and it is essential in rope rescue.
Being able to change over easily from ascending to abseiling and vice versa
is also very useful if you ever have a cock-up (get stuck on the rope) as
it will usually enable you to extricate yourself.
- Make sure your foot
ascender isn't a long way above your chest ascender
- Put your descender on the
rope below your ascenders and lock it off
- stand in footloops to unweight
chest ascender and unclip chest ascender from rope
- Sit back down until
weight is taken by descender
- Unclip foot ascender from the rope
- Unlock
descender and abseil
NOTE: You will find this manoeuvre more difficult if you use a
long descender such as a whaletail which takes up a lot of space on the rope.
It is difficult to rig it far enough up the rope so that your foot ascender
safety-cord is slack when you sit back on the descender, particularly if your
safety-cord is on the short side. One way around this is to stand in your
footloops and clip your short cowstail into your foot ascender. Remove the
chest ascender from the rope and sit onto the cowstail. Removing the chest
ascender makes more room on the rope for rigging the descender. When the
descender is rigged (as high up the rope as possible, just below the foot
ascender) stand in the footloops to unclip the short cowstail and sit back down
onto the descender. The safety cord should now be slack allowing the foot
ascender to be taken off the rope. This "sneaky" method of doing a changeover
can't be wholly recommended as you are hanging from a single ascender at one
point, which strictly speaking isn't safe. A variant of this technique
can also be used for speeding up knot passes (provided you have a short
descender!).
Down-prussiking is used for passing knots when descending, and also used if you
need to descend a loaded rope for any reason (i.e. unconscious person on rope
below you that needs rescuing). To down-prussik, unweight your chest ascender by
standing in your footloops, depress the chest ascender cam from the top to
release the rope and slide the ascender down the rope. Release the cam so the
chest ascender grips the rope and put your weight on it while you move the foot
ascender down the rope. Repeat as often as necessary!
You may encounter a knot mid-rope for a number of reasons. Usually it is
where two ropes are tied together as a single rope isn't long enough to reach
the bottom. You may also encounter a knot
where a rebelay has failed or where a damaged section of rope has been
tied out.
Abseiling: - Abseil down to knot
- Clip long cowstail into the
loop tied in the tail emerging from the knot (see pic)
- Put foot ascender on
the rope a few inches above descender
- Stand in footloops and clip chest
ascender into rope between foot ascender and descender
- Take descender off
rope
- Down-prussik to knot
- Transfer ascenders (chest ascender first then
foot ascender) from above to below the knot
- Put descender on the rope below
your ascenders and lock it off
- Unclip long cowstail
- Stand in footloops
to unweight chest ascender and unclip chest ascender from the rope
- Sit back
down and transfer weight to descender
- Remove foot ascender from rope
- Unlock descender and continue abseiling
NOTE: There is a "quick and sneaky" way of passing a knot (while abseiling) that can be
used by people with short descenders (and not-too-short safety
cords). Abseil onto the knot and put the foot ascender on the rope just
above the descender. Clip the long cowstail into the knot-loop for protection.
Stand in the footloops, clip the short cowstail
into the foot ascender and sit back down on the short cowtail. Take descender
off the rope, put it on the rope below the knot and lock it off. Stand in the footloops
to unclip the short cowstail, and sit back down (hopefully) onto the descender.
Unclip the footloops and long cowstail and abseil. If your descender is too
long, or your safety loop is too short you won't be able to do this - it's the kind of
thing you should try out in a tree before having a go underground!
Prussiking:
- Prusik up to just below the knot (not hard up to the knot)
- Clip long
cowstail into the loop tied in the tail emerging from the knot.
- Transfer
foot ascender from below to above the knot
- Transfer chest ascender from
below to above the knot
- Unclip cowstail and continue prussiking
Ideally you shouldn't need rope protectors to rig a pitch, but some rub point are
very hard to avoid, and a rope protector can be much simpler than trying to rig
the rope around them. To pass a rope protector when abseiling: - Abseil
down until you can reach the rope protector knot and lock off your descender -
DON'T abseil onto the knot!
- Unfasten the rope protector and untie it from
the rope (don't drop it!)
- Abseil to below where the rope protector was tied
on and lock off.
- Tie the rope protector back onto the rope above your
descender using a prussik knot.
- Fasten up the rope protector as you descend
past it, checking that it is correctly positioned.
When prussiking the
procedure is almost the same: - Unfasten the rope protector when you reach
it and prussik up to just below the rope protector knot.
- Untie the rope
protector
- Prussik up a little
- Retie the rope protector on below you and
fasten it around the rope.
- Check the rope protector is positioned properly
before carrying on up the pitch.
A pendulum or pendule is basically a variant of a rebelay where the upper and
lower ropes are much further apart horizontally (see pic). If abseiling on the
upper rope you wont be able to reach over to the rebelay knot to clip in. When
level with the knot lock off your descender and pull yourself towards the
rebelay using the pendulum loop. Clip in your short cowstail and continue as if
you were passing a normal rebelay. If prussiking, start as if passing a normal
rebelay (use the pendulum loop to pull in the slack on the upper rope). When
your ascenders are on the upper rope you will find your cowstail is taut. Pull
yourself towards the rebelay to slacken and unclip your cowstail and then use
the pendulum loop to let yourself out across the pitch (otherwise you will go
flying across the pitch which is rather unpleasant).
If a caver is knocked out by a falling rock while on a rope, or becomes
unconscious for some other reason, you need to be able to get them off the rope
as fast as possible. A person lying unconscious in their SRT harnesses may
start to suffocate due to construction of the chest by the chest harness, or
possibly due to choking on their tongue. If the casualty is not breathing at
all you have 4 minutes to reach them (and you'd have to be bloody fast to figure
out what was wrong and get there in time to do anything about it). If the
casualty is breathing you have a little longer. The procedure described below
assumes you are at the bottom of the pitch, below the casualty. If you are at
the top you would have to down-prussik to the casualty, clip their short cowstail
into you, and then continue as from step 4. I have also assumed that the
casualty was prussiking. If they'd been abseiling they would a) have been using a
stop in which case once you reach them, clip into them and use their descender
to get down the pitch. b) be stuck in a rebelay loop, in which case the
procedure is much the same as if they'd been prussiking, or c) have ended up at
the bottom of the pitch. - Prussik up to below the casualty and clip
their short cowstail into your central maillon.
- Remove the casualty's foot
ascender
- Move your foot ascender and then chest ascender past the casualty's
chest ascender onto the rope above the casualty (as if you were passing a knot).
- Continue prussiking until you have taken the weight of the casualty on their
short cowstail (which is clipped into you). This is strenuous.
- Remove the
casualty's chest ascender from the rope.
- Put your descender on the rope
below your chest ascender, and lock it off (full lock off).
- Stand up in
your footloops (you'll be taking the weight of the casualty) and remove your
chest ascender. This is the difficult part.
- Sit back down onto your
descender (your footloops safety cord should be slack when you've sat down).
- Unclip your foot ascender, unlock your descender and abseil to the bottom
of the pitch with the casualty.
If you can't lift the
casualty: Lifting someone by standing in your footloops isn't easy. If you
cant lift them you can re-rig your footloops to give a 2:1 pulley advantage
which should enable you to lift almost anyone. To re-rig your footloops, unclip
the safety cord and footloops from the foot ascender and tie the footloops to
the safety cord. Run the safety cord through a krab (or if you have one, a
pulley) which is clipped to the foot ascender (see picture). Now when you stand
in the footloops you'll find you are expending less effort in standing up
(although you'll only move half as far). You may find the footloops are too long
in this arrangement and you'll need to tie out a small section to shorten them.
With this re-rig, you effectively have no safety cord between you and your
footloops. You could clip in your long cowstail to your foot ascender as a
safety cord (otherwise you'll spend a short period during the manoeuvre attached
to the rope only by one ascender which is unsafe).
If your footloops safety cord is taut when you sit onto your descender:
Conventionally you would stand in your footloops, re-attach your chest ascender,
move the foot ascender down a bit and try again (i.e. stand in footloops,
remove chest ascender and sit back onto descender). At a pinch (and time is of
the essence here) you could just stand in your footloops to slacken the safety
cord, unclip the safety cord from the foot ascender and sit down onto the
descender, It is possible that you would be unable to recover the foot ascender
if you did this, but don't forget you have a spare attached to the casualty.
Rebelays: If possible derig any rebelays/deviations between you and the
casualty on your way up. This wont be possible if the pitch has been well
travelled, or if you approach the casualty from the top of the pitch. If you do
have to pass rebelays on the way back down, treat the casualty as a heavy
tackle-bag and proceed as usual. You may need to use your footloops to unweight
your short cowstail prior to unclipping it, and re-rigging your footloops as
described above would help.
Use your brain (& practice lots): You may not be able to do this
manoeuvre exactly as described here, but if you are familiar with the basic
techniques and equipment you should be able to work around any difficulties in
safety with a bit of cunning.
It is assumed in most of the sections above that you are using a "Frog rig"
for prussiking. This is just one of numerous prussiking rigs, but it is one of
the most popular as it is simple and versatile, less prone to "cock-ups" and
easy to pass rebelays etc with. Of the alternative prussiking set-ups,
"ropewalking" systems are the most popular, especially with US cavers.
Ropewalking systems are generally more complex than the frog rig, but they
do have a speed advantage provided there are no rebelays or deviations (which
is why ropewalking and "Indestructible Rope Technique" are popular with the same
people!). Described below are two methods for turning a frog-rig into a
rope-walking (or semi-ropewalking) rig.
Hybrid Frog-ropewalker
All this requires in addition to the frog-rig in an extra ascender which is
attached to the foot firmly with a webbing strap. The other foot still uses the
footloops as is the conventional frog-rig. If you use a single footloop
rather than a pair, you
will probably need to shorten it a little to make it the correct length for use
with one foot only.
Clip in the chest ascender and footloop foot ascender as usual. Also clip in the
ascender attached to the other foot. Instead of ascending by standing up with
both feet at the same time progress is made by a walking motion, first lifting the footloops
then standing up in the footloops and raising the other foot sliding its ascender up the rope
ready for the next step.
This is a very simple modification to the frog-rig which can give some of the
speed advantages of rope-walking, however it is not really a true rope-walking
rig.
The 'Caving Supplies' Combination rig
Thanks to Nigel Whittington for this description which I've quoted straight
from his email.
This is a simple modification of the 'Frog' rig that enables
energy-efficient ropewalking technique to be used on long pitches and
Frog technique to be used on alpine style deviations and rebelays using
the same personal rig.
It uses the standard 'Frog' rig with the addition of an extra
jammer, buckled footloop, elastic cord and two carbine hooks. A slight
modification to the footloop is also made.
Make or buy a webbing strap (load bearing!) that will wrap around your
ankle and foot in a fig 8 pattern. Use this to fix a non-handled Petzl
(™) jammer to your LEFT foot.
Modify the footloop on your top jammer so it can be shortened to about
15-20 cm. This can be done several ways, e.g. an extra knot or just
clipping the lower loop into the crab or maillon on the jammer.
The jammer is attached BELOW the chest jammer and the footloop should be
adjusted so that with the right foot raised the jammer is just below the
chest jammer, with the right foot raised the foot mounted jammer should
not foul the floating jammer.


a) set-up for frog rig with slightly altered footloop
b) alteration to footloop and addition of left foot ascender for ropewalking
Attach an elastic cord to the top of the jammer with a carbine hook, run
the cord over your shoulder and attach to the back of your harness via a
second carbine hook.
A crab on the chest harness can be used to clip onto the rope to prevent
the possibility of inversion and hanging from ones ankles in the event
of the chest jammer accidentally opening.
USE
Clip in all three jammers as described, and take short, alternating
steps. At the foot of a pitch you may need to weight the rope to ensure
the rope runs through the foot jammer.
To transfer to Frog:
Disconnect the floating jammer.
Lengthen footloop.
Remove elastic cord (optional)
Connect floating jammer above chest jammer.
Disconnect foot jammer.
Feet in footloop.
Et Voila, Le Frog!
To transfer to ropewalking:
Connect foot jammer.
Shorten footloop on top jammer.
Disconnect top jammer.
Connect top jammer on rope between foot jammer and chest jammer.
Pass elastic cord from back of harness, over shoulder and clip to top of
what is now the floating jammer (was top jammer).
Right foot in shortened loop.
Et Voila, Ropewalking.
Further reading
If you want more detailed information, read a good SRT
book such as "Vertical" by Al Warild, "Single Rope Technique" by Neil
Montgomery, or the recent e-book
"Life
on a Line" (free download) by Dave Merchant.
- top of page
-
|
 The Harness:
 u get into a tangle. However, there are definite advantages to
attaching the other end of the cord (and also the footloops) to the ascender via
a maillon or krab, particularly if you're doing a rope rescue (see rope-rescue
section on the pulley-style footloops rig).


 the rope in and letting the cam close on
the rope. The cam is usually prevented from opening fully by a safety catch
which has to be disengaged for getting the ascender on and off the rope - for
any other manoeuvres the safety catch should be left in place.